Setting up recurring billing in BuddyPress takes some advanced knowledge, but if you’re a web developer it will be easier than you might expect. And incredibly powerful. The following is a detailed guide on how to set up paid subscriptions with multiple levels of access on a BuddyPress-powered website. The four things you will need are:
Alternatively you can have us set all of this up for you. Fill out our contact form to get a quote for our assistance. We’ve done this many times before.
Step 1: Get a dedicated IP address for your website
In order to install an SSL certificate (covered in Step 2) your website will need to have its own dedicated IP address.
If you are on a shared hosting plan you are almost definitely on a shared IP address as well. We recommend using the HostGator Business level hosting, which will give you both a dedicated IP address and a free SSL certificate and will speed up this whole process dramatically. If you already have a web host, contact them and inquire about how to get your site set up on a dedicated IP address.
Step 2: Get an SSL certificate
 In order to handle payments on-site (as opposed to sending your users over to PayPal) you need to have an SSL certificate.
SSL stands for Secure Sockets Layer, a fancy acronym for how to transmit private documents via the Internet. The purpose of SSL is to ensure that data sent between your browser and the payment processor (PayPal in this case) cannot be deciphered by a third party. Without SSL this info is sent as plain text, with SSL it’s encrypted. Basically, SSL prevents credit card numbers and other private data from being stolen.
So where do you get an SSL certificate?
If you have the Business level web hosting plan with HostGator, your hosting comes with a dedicated SSL certificate. You can call their customer support and they will install it on your domain for you. If you have a lower plan with them, we’d recommend upgrading to the Business plan so you can just be done with it. Here is the form to sign up for your SSL certificate.
If you’re on another host, you should call them and inquire if your plan comes with a dedicated SSL certificate. You don’t want a shared one. If it doesn’t, or if it’s very expensive, we recommend buying one from GoDaddy. They sell SSL certificates for $25/yr which is about as cheap as you’ll find anywhere. You can then download the certificate, and email it to your host and request that they install it for you.
Step 3: Set up PayPal Pro
 You will be using s2Member to handle subscriptions and to restrict content based on membership level (covered in Step 4). s2Member requires a PayPal Pro account to handle payment processing.
Your users will not be sent to PayPal’s website and do not need to have a PayPal account. They will pay using a form right on your site with their credit card and will have no idea that PayPal is handling the payment. There are other payment processors out there, but I highly recommend using PayPal so you can benefit from the amazing features and very simple setup included with s2Member.
PayPal’s free Business account will not allow you to have recurring subscriptions or on-page payment forms. To get these necessary features you will need to apply for a Pro account (often referred to as “Website Payments Pro”). PayPal will not approve of your application until they see that you have a website set up that (a) describes your business and (b) lists prices for your products/services. This is not that hard. Just set up your homepage on your BuddyPress site to clearly describe your services and list the monthly/yearly fees you’ll be charging paid members. This does not need to be a perfectly crafted sales page — it just needs to pass PayPal’s standards. When you have your page written submit the link to PayPal. In my experience you can get an account approved within a week. If they are being slow, call them and you can get them to move the process along quickly.
Got your PayPal Pro account approved? Excellent. Lets move on to the final step.
Step 4: Set up s2Member Pro
s2Member is wonderful. It’s one of my favorite WordPress/BuddyPress plugins (along with Gravity Forms). s2Member allows you to:
- Charge users a recurring billing subscription for membership access
- Charge users for single-purchase access (Buy It Now)
- Seamlessly integrate with PayPal for on-site billing
- Restrict access to specific pages and posts, post categories, and URI fragments (such as /groups/)
- Have up to 5 custom membership levels of varying access, including a basic free level
- Redirect logged in users to a specific URL on your site
- And much more…
How much does it cost?
 The price for the s2Member Pro plugin is $69 for a single domain license and $129 for an unlimited domain license. If you are a web developer I’d recommend buying the unlimited domain license. I’ve used my unlimited license on many BuddyPress-powered websites for my clients.
a. Installing s2Member
s2Member can be installed like any other WordPress plugin. Just go to the s2Member website, pay for your pro account, and download the files. You will be downloading 2 plugin files; s2Member and s2Member Pro. The basic s2Member plugin gives you all of the capabilities for setting up membership levels and restricting access. The additional s2Member Pro plugin adds support for on-page payments and recurring subscriptions. You will need to upload both plugins to your /plugins/ directory via FTP and then activate s2Member in your WordPress admin.
In addition to the plugins, you will also need to upload a license key. Just tell the people at s2Member what your domain is and they’ll email you a file called s2member-pro-key.php. Upload this file with the other plugins to your /plugins/ directory. Edit: New versions of the s2Member Pro plugin do not require a license key.
b. Getting started with s2Member
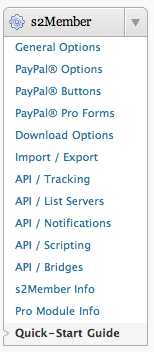
 Once installed, you will see a new s2Member section in the side menu of your WordPress admin. Click on the Quick-Start Guide and you will see an extremely useful guide for using the plugin.
Once you’ve read the guide, head over to the General Options panel. To make this clear, going forward items with an asterisk will refer to sections in s2Member panels.
* General Options > Security Encryption Key
Pop open the first section titled Security Encryption Key. Have it generate a key for you and make sure to save this key somewhere safe. As it mentions, you configure the key once for each installation of s2Member and you never change it. Scroll to the bottom of the page to click the Save Changes button.
* General Options > Deactivation Safeguards
Skip the other options for now and head to Deactivation Safeguards at the bottom. ClickYes. This is very important. If you skip this step all of your s2Member configurations will be lost every time you deactivate the plugin.
* General Options > Email Configuration
This is the email address that will be used for notifications sent out during the signup process. I’d suggest setting up an email such as support@yourdomain.com for this.
* General Options > Login / Registration Design
This allows you to change the design of your login page located at the usual /wp-login.php. I recommend using your logo so users aren’t confronted with the default s2Member logo.
* General Options > Custom Registration Fields
If you are using BuddyPress ignore this. Your users will enter the profile fields you have set up within BuddyPress.
* General Options > Membership Option Page
This is the page you will use to market your product and include links to your payment forms. Create the page in the Pages section of your WordPress admin, and then come back here and select the page you just created from the dropdown.
* General Options > Open Registration / Free Subscribers
In many cases you will want to maintain a free level of access. If so, select Yes from the dropdown.
* General Options > Membership Levels/Labels
Level #0 is the free level, and the remaining four levels will be for paid subscriptions. You do not need to use all of them. Create a naming scheme for your levels and enter the names in here. Some examples are:
- Bronze, Silver, Gold, Platinum
- Level 1, Level 2, Level 3, Level 4
- Basic, Plus, Premium, Max
c. Integrating s2Member with PayPal Pro
* PayPal Options > PayPal Account Details
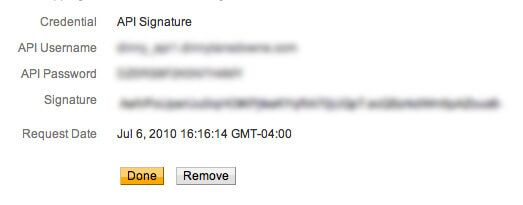
You need to enter your PayPal Pro email address, API username, API password, and API signature. Use the email address associated with your PayPal account and get the rest on their website. PayPal is a confusing site and it took me a while to find all of this information the first time. Login to your PayPal account, and go to: Profile > Request API Credentials. You will see two boxes with different options. Click the 2nd link in the Option 1 box.

Now you will be presented with two more boxes. Click the link in the Option 2 box to get your API certificate. You should now have all of the details you need.

* PayPal Options > PayPal IPN Integration
To enable Instant Payment Notifications (IPN) go to your PayPal account, and head to My Account > Profile > Instant Payment Notification preferences. Click the button called Choose IPN Settings.
Enter the IPN URL provided for you in the PayPal IPN Integration section of s2Member. Then in PayPal, select Receive IPN messages (Enabled). Click Save.
* PayPal Options > PayPal PDT Integration
Go to your PayPal account. Head to Account > Profile > Website Payments Preferences (under the section Hosted payment settings). Turn Auto Return on. Turn Payment Data Transfer on. Click save. Refresh the page. You should now see a unique Identity Token.

Copy this token and paste it into s2Member in the field for PayPal PDT Identity Token. Save your changes.
d. Setting up PayPal Pro forms
* PayPal Pro Forms > Quick-Start Guide For PayPal Pro Integration
This guide is very helpful and I suggest reading it.
* PayPal Pro Forms > PayPal Pro / Free Registration Forms
This section should give you a shortcode to use to generate your free signup form (if you previously selected Yes for Free Subscribers). The code should look something like:
![]()
Now go into your WordPress Pages menu and create a new page to advertise your free signups. Add this code into the editor. I would suggest linking to this page from the Membership Options page you set up earlier.
* PayPal Pro Forms > PayPal Pro Forms For Level #1 Access (and 2, 3, 4)
Set up your payment terms for the level you have open. Then click Generate Form Code. You should now have a WordPress Shortcode which you can add to any page on your website. Go into your WordPress Pages menu and create a new page for each of the levels you are using. Add the generated shortcode into the editor for each page. I would suggest linking to these pages from the Membership Options page you set up earlier.
The final form should look something like this.
To be absolutely sure the forms are all SSL enabled, go into the page editor for each page containing a form and add the custom field s2member_force_ssl = yes.

e. Setting up membership levels
Now that we have our membership levels set up with working payment forms, it’s time to set up access restrictions for each of the levels. s2Members has tons of options for restricting content. I’ll cover a few of them so you get the idea. Go back to General Options in s2Member.
* General Options > Page Access Restrictions
From here you can restrict specific pages to members of each level. If a logged out user tries to access one of the pages you restricted, he or she will be redirected to the Membership Options page you set up earlier.
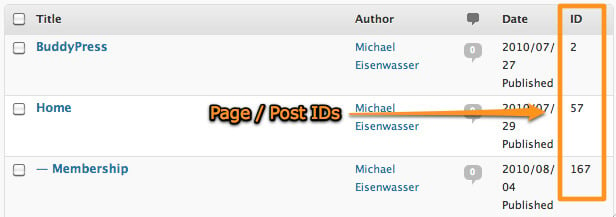
You will need to enter the Page IDs, separated by commas, for each page you wish to restrict. To get a page’s ID you can find that page in the editor, click Edit, then view the ID you see up in your URL bar in your browser for the particular page. But there’s a better way… Just install and activate the WP Show IDs plugin. Now you will be able to see all of your page/post IDs from the Page and Post menus.

You can navigate to the Post, Tag, and Category Access Restrictions and follow the same process. To see the IDs for categories, just click the Categories menu under Posts. It should display the ID for each category.
* General Options > URI Access Restrictions
This is a neat and extremely useful feature. You can enter any URI fragment and any URLs that include that fragment will be restricted to the level you specify. For example, if you enter /groups/ all URLs with the word “groups” in them will be restricted. Only users logged in at that membership level will be able to view groups pages. If you only want to restrict creating groups, then you should enter /groups/create/ as the URI fragment.
Want us to do it all for you?
We’ve gone through this whole process many times. Fill out our contact form to get a quote for our assistance. We’ll be happy to help.


 © All rights reserved, BUDDYBOSS LLC 2024


